Based on the previous tutorials, we are now going to explain, how a simple card game can be implemented with the techniques shown so far.
This tutorial especially explains how multiple instances of graphic objects can be elegantly used – in our case a whole card deck.
The fonts from the bitmap font tutorial were transferred to the directory "fonts" and the corresponding script was adjusted accordingly.
For our tutorial we have downloaded pre-built card graphics from https://code.google.com/p/vector-playing-cards and added them to the directory PNG-cards-1.3.
data/orig/fontsdata/orig/PNG-cards-1.3/clubsdata/orig/PNG-cards-1.3/diamondsdata/orig/PNG-cards-1.3/heartsdata/orig/PNG-cards-1.3/miscdata/orig/PNG-cards-1.3/spades
As a texture containing all cards would become too large, we decide to create an individual texture for every card suit. For this purpose, the cards are moved to same-named sub-directories in order to allow creating individual card textures with a configuration file.
scripts/atlas_config_cards.xml
This configuration file has the special feature of using an external attribute named cardType. External attributes are set in the script when calling the atlas_generator.
<?xml version="1.0"?>
<!-- Copyright 2013 Spraylight GmbH -->

<AtlasGenerator cardType="">

    <Input path="../data/orig/PNG-cards-1.3/{cardType}">

        <Matte color="0i, 0i, 0i"/>

        <Image scanAll="yes" sizeX="90" sizeY="130"/>

    </Input>

    <Output path="../data/packages/game.murlres">

        <Atlas sizeRaster="2"/>

        <Image name="gfx_{cardType}.png" margin="1"/>

        <PlaneGraphXML name="planes_{cardType}.xml"/>

    </Output>

</AtlasGenerator>
Here, it can be seen that the cardType attribute is used on several positions as substitute. Additionally, a pre-defined value can be set for external attributes in the root tag. <AtlasGenerator cardType=""> does not affect anything, but it is indicated for demonstration purposes.
As the cards have a rather high resolution, we scale them to a suitable size by using <Image scanAll="yes" sizeX="90" sizeY="130"/>. Here, it can be clearly seen that scaling with a large scaling factor results in a loss of quality. For our tutorial, this is tolerable, but it is recommended to download the vector data of the cards and to save them as PNG in the desired size.
The corresponding script calls the atlas_generator as follows:
%MURL_ATLAS_GENERATOR% -q --config atlas_config_cards.xml --attribute cardType="clubs"
%MURL_ATLAS_GENERATOR% -q --config atlas_config_cards.xml --attribute cardType="diamonds"
%MURL_ATLAS_GENERATOR% -q --config atlas_config_cards.xml --attribute cardType="hearts"
%MURL_ATLAS_GENERATOR% -q --config atlas_config_cards.xml --attribute cardType="spades"
%MURL_ATLAS_GENERATOR% -q --config atlas_config_cards.xml --attribute cardType="misc"
Consequently, a texture and a corresponding graph file are generated from the single-images in the five directories.
Scene Graph
For this tutorial, the scene graph is divided in several different files with the prefix "graph_".
<?xml version="1.0" ?>
<!-- Copyright 2013 Spraylight GmbH -->
<Package id="game">

    <!-- Animation resources -->
    <Resource id="anim_game_screen"     fileName="anim_game_screen.xml"/>

    <!-- Bitmap resources -->
    <Resource id="gfx_clubs"            fileName="gfx_clubs.png"/>
    <Resource id="planes_clubs"         fileName="planes_clubs.xml"/>
    <Resource id="gfx_diamonds"         fileName="gfx_diamonds.png"/>
    <Resource id="planes_diamonds"      fileName="planes_diamonds.xml"/>
    <Resource id="gfx_hearts"           fileName="gfx_hearts.png"/>
    <Resource id="planes_hearts"        fileName="planes_hearts.xml"/>
    <Resource id="gfx_misc"             fileName="gfx_misc.png"/>
    <Resource id="planes_misc"          fileName="planes_misc.xml"/>
    <Resource id="gfx_spades"           fileName="gfx_spades.png"/>
    <Resource id="planes_spades"        fileName="planes_spades.xml"/>

    <!-- Font resources -->
    <Resource id="arial_color_24_glyphs" fileName="fonts/arial_color_24_glyphs.murl"/>
    <Resource id="arial_color_24_map"    fileName="fonts/arial_color_24_map.png"/>
    <Resource id="arial_color_48_glyphs" fileName="fonts/arial_color_48_glyphs.murl"/>
    <Resource id="arial_color_48_map"    fileName="fonts/arial_color_48_map.png"/>

    <!-- Graph resources -->
    <Resource id="graph_camera"         fileName="graph_camera.xml"/>
    <Resource id="graph_game_card"      fileName="graph_game_card.xml"/>
    <Resource id="graph_game_card_suit" fileName="graph_game_card_suit.xml"/>
    <Resource id="graph_game_screen"    fileName="graph_game_screen.xml"/>
    <Resource id="graph_materials"      fileName="graph_materials.xml"/>
    <Resource id="graph_textures"       fileName="graph_textures.xml"/>

    <!-- Graph instances -->
    <Instance graphResourceId="graph_materials"/>
    <Instance graphResourceId="graph_textures"/>
    <Instance graphResourceId="graph_camera"/>

</Package>
The actual starting point for this is the graph_camera instance. This defines as usual a view with a camera and instantiates the graph_game_screen sub-graph. Dividing the sub-graphs on file level is recommended in order to keep track at larger projects.
<?xml version="1.0" ?>
<!-- Copyright 2013 Spraylight GmbH -->
<Graph>
    <Namespace id="game_screen">

        <Timeline id="screen_timeline">
            <Transform controller.animationResourceId="game:anim_game_screen">

                <FixedParameters id="screen_parameters"
                controller.animationResourceId="game:anim_game_screen"/>
                <ParametersState parametersId="screen_parameters"/>

                <!-- Green playfield -->
                <Reference targetId="/materials/state_plain_color"/>
                <FixedParameters diffuseColor="0i, 100i, 0i, 255i"
                    parentParametersId="screen_parameters">
                    <PlaneGeometry posX="0" posY="0"
                    frameSizeX="1500" frameSizeY="768"/>
                </FixedParameters>

                <!-- Text material -->
                <Reference targetId="/materials/state_plain_tex_color"/>

                <!-- Title text -->
                <Reference targetId="/textures/arial_color_48"/>
                <TextGeometry id="title_text"
                posX="0" posY="340"
                fontResourceId="game:arial_color_48_glyphs"
                text="Pyramid Card Game"/>

                <!-- Info text -->
                <Reference targetId="/textures/arial_color_24"/>
                <TextGeometry id="info_text"
                posX="0" posY="-140"
                fontResourceId="game:arial_color_24_glyphs"/>

                <!-- Cards -->
                <Reference targetId="/materials/state_plain_front_tex_color"/>

                <TextureState textureId="/textures/tex_misc"/>
                <Instance cardName="black_joker" graphResourceId="game:graph_game_card"/>
                <Instance cardName="red_joker"   graphResourceId="game:graph_game_card"/>

                <Instance suitName="clubs"    graphResourceId="game:graph_game_card_suit"/>
                <Instance suitName="diamonds" graphResourceId="game:graph_game_card_suit"/>
                <Instance suitName="hearts"   graphResourceId="game:graph_game_card_suit"/>
                <Instance suitName="spades"   graphResourceId="game:graph_game_card_suit"/>

                <Button id="stack_button" depthOrder="1000"/>

            </Transform>
        </Timeline>

    </Namespace>
</Graph>
Our playing screen starts with a <PlaneGeometry> node for a green background and two <TextGeometry> nodes to display text information.
The last block instantiates the playing cards. In order to display a card face and card back, we reference a material, which uses the so-called Backface Culling of the graphic chip. This feature only renders the card face of polygons and is activated in the corresponding <Material> node with the attribute visibleFaces="FRONT_ONLY".
Every card is instantiated with the following sub-graph. Our example begins with the instances of the black_joker and red_joker card.
It has to be considered that the suitable <TextureState> is set prior to this.
<?xml version="1.0" ?>
<!-- Copyright 2013 Spraylight GmbH -->
<Graph>

    <Namespace id="{cardName}" activeAndVisible="no">

        <Transform id="position">

            <Reference targetId="/textures/{cardName}"/>

            <SubState>
                <TextureState textureId="/textures/tex_misc"/>
                <Transform axisX="0" axisY="1" axisZ="0" angle="180 deg">
                    <Switch id="back_switch">
                        <Reference targetId="/textures/black_back"/>
                        <Reference targetId="/textures/red_back"/>
                    </Switch>
                </Transform>
            </SubState>

            <Button id="button" sizeX="90" sizeY="130"/>

        </Transform>

    </Namespace>

</Graph>
Here, the face and back side texture of the card instance is referenced. The texture of the back side is rotated through 180° on the vertical axis in order to fulfill the conditions of Backface Culling.
To create all instances of the four card suits, another sub-graph is instantiated which summarizes all cards with the same texture.
<?xml version="1.0" ?>
<!-- Copyright 2013 Spraylight GmbH -->
<Graph>

    <TextureState textureId="/textures/tex_{suitName}"/>

    <Instance cardName="ace_of_{suitName}"   graphResourceId="game:graph_game_card"/>
    <Instance cardName="2_of_{suitName}"     graphResourceId="game:graph_game_card"/>
    <Instance cardName="3_of_{suitName}"     graphResourceId="game:graph_game_card"/>
    <Instance cardName="4_of_{suitName}"     graphResourceId="game:graph_game_card"/>
    <Instance cardName="5_of_{suitName}"     graphResourceId="game:graph_game_card"/>
    <Instance cardName="6_of_{suitName}"     graphResourceId="game:graph_game_card"/>
    <Instance cardName="7_of_{suitName}"     graphResourceId="game:graph_game_card"/>
    <Instance cardName="8_of_{suitName}"     graphResourceId="game:graph_game_card"/>
    <Instance cardName="9_of_{suitName}"     graphResourceId="game:graph_game_card"/>
    <Instance cardName="10_of_{suitName}"    graphResourceId="game:graph_game_card"/>
    <Instance cardName="jack_of_{suitName}"  graphResourceId="game:graph_game_card"/>
    <Instance cardName="queen_of_{suitName}" graphResourceId="game:graph_game_card"/>
    <Instance cardName="king_of_{suitName}"  graphResourceId="game:graph_game_card"/>

</Graph>
Consequently, we have created all 54 card instances including their face and back with reasonable effort.
Application
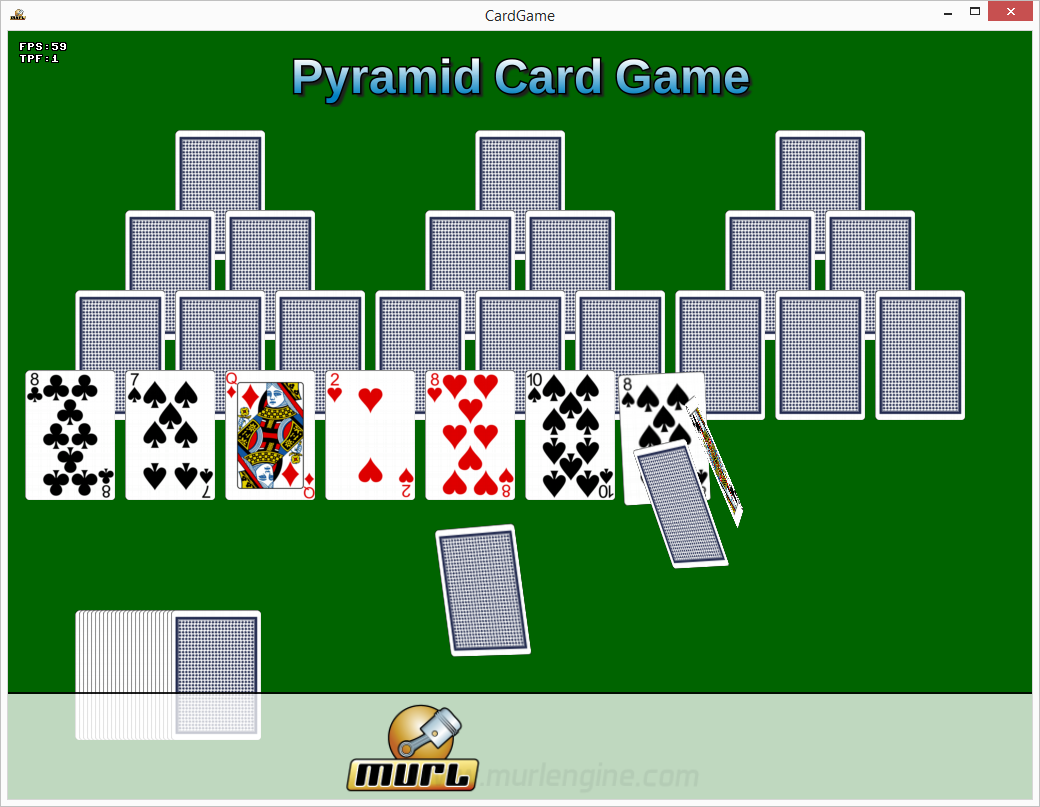
The classic card game Pyramid Solitaire places 28 cards as three pyramids onto a tableau and uncovers the bottom row. The remaining cards are set on the tableau to form a draw pile – the waste. The top card of the waste is face up and any card of neighboring rank can be moved from the pyramids to the waste. The suit does not need to be considered. If no suitable card is on the pyramid, a new card can be revealed from the remaining cards.
To finish Pyramid Solitaire, all cards have to be eliminated from the tableau. The game is lost, if no suitable card can be moved to the waste and all remaining cards are revealed.
Setup of a card instance
Our game has 54 card instances, which are all controlled separately. For this purpose it is recommended to implement a class, which controls exactly one card. This class is then instantiated for each card. Therefore, it is possible to create a symmetry between the logic classes and the sub-graphs.
        class CardInstance : public Logic::GraphPositionInstance
        {
        public:
            CardInstance();
            virtual ~CardInstance();

            virtual Bool Init(Logic::INodeObserver* nodeObserver, const Graph::IRoot* root,
                              const String& path, SInt32 baseDepth);

            virtual void OnProcessTick(const Logic::IState* state);

            enum BackSideType
            {
                BLACK,
                RED
            };
            void SetBack(BackSideType backSide);

            void SetCardPosition(const Vector& position, Bool showFront, Real duration = 0);
            void MoveCardToPosition(const Vector& position, Bool showFront, Real duration);
            Bool IsMoving() const;
            Bool IsShowingFront() const;

            void EnableButton(Bool enable);
            Bool WasPressed() const;

        protected:
            Logic::ButtonNode mButton;
            Logic::SwitchNode mBackSwitch;

            Logic::BaseStepableObserver mStepableObserver;
            Logic::AnimationVector mPositionAnim;
            Logic::AnimationVector mRotationAnim;

            Bool mIsShowingFront;
        };
A card instance has a namespace node and a transform node. This typical constellation is supported by the Logic::GraphPositionInstance base class, which provides methods for manipulating the position and for activating the namespace node. The virtual Init(…) method is overloaded in order to initialize our derived class.
Furthermore, this base class is a stepable object allowing us to implement an OnProcessTick(…) method.
Afterwards, several methods are implemented in order to specify properties and movements and to query the current condition of the card.
The card instance has a Logic::ButtonNode mButton for interaction and a Logic::SwitchNode mBackSwitch node for the texture of the card back.
In order to animate the card, we use a Logic::AnimationVector mPositionAnim for positioning and a Logic::AnimationVector mRotationAnim for rotation.
Since the card object has no built-in StepableObserver, it has to be instantiated with Logic::BaseStepableObserver mStepableObserver.
Initialization of a card instance
Bool App::CardInstance::Init(Logic::INodeObserver* nodeObserver, const Graph::IRoot* root,
                             const String& path, SInt32 baseDepth)
{
    nodeObserver->Add(mButton.GetReference(root, path + "/button"));
    nodeObserver->Add(mBackSwitch.GetReference(root, path + "/back_switch"));

    if (!Logic::GraphPositionInstance::Init(nodeObserver, root, path, baseDepth))
    {
        return false;
    }

    mPositionAnim.AddKey(Real(0.0), Vector(Vector::ZERO_POSITION), IEnums::INTERPOLATION_EASE_OUT);
    mPositionAnim.AddKey(Real(1.0), Vector(Vector::ZERO_POSITION));

    mRotationAnim.AddKey(Real(0.0), Vector(), IEnums::INTERPOLATION_LINEAR);
    mRotationAnim.AddKey(Real(0.5), Vector(), IEnums::INTERPOLATION_EASE_OUT);
    mRotationAnim.AddKey(Real(1.0), Vector());

    mStepableObserver.Add(mPositionAnim);
    mStepableObserver.Add(mRotationAnim);

    SetBack(false);
    EnableButton(false);
    SetCardPosition(mPosition, false);
    mIsShowingFront = true;

    return true;
}
At first, the initialization creates the references for the button node and the switch node.
(!) Afterwards, the Init() method of the base class is called. This is absolutely necessary to ensure the functionality of the base class.
Furthermore, several animation data points are prepared and the AnimationVector instances are added to the StepableObserver.
In the last block, several default values are set.
Processing a card instance
void App::CardInstance::OnProcessTick(const Logic::IState* state)
{
    mStepableObserver.ProcessTick(state);

    if (mPositionAnim.IsOrWasRunning())
    {
        const Vector& currentPosition = mPositionAnim.GetCurrentValue();
        SetPosition(currentPosition);
    }

    if (mRotationAnim.IsOrWasRunning())
    {
        const Vector& currentRotation = mRotationAnim.GetCurrentValue();
        mTransformNode->SetRotation(currentRotation.x, currentRotation.y, currentRotation.z);
    }
}
(!) The OnProcessTick() method has to call the mStepableObserver.ProcessTick(state) method in order to make sure that the StepableObserver works properly.
Afterwards, the current values of the AnimationVector objects are evaluated and transferred to the corresponding card properties.
Logic Setup
        class CardGameLogic : public Logic::BaseProcessor
        {
            ...

            enum States
            {
                STATE_IDLE = 0,
                STATE_DEAL,
                STATE_PLAY
            };
            Logic::EnumStateMachine<States>::Type mStateMachine;

            void OnEnterDeal(const Logic::IState* logicState);
            void OnProcessTickDeal(const Logic::IState* logicState);

            void OnEnterPlay(const Logic::IState* logicState);
            void OnProcessTickPlay(const Logic::IState* logicState);

            ...

            ObjectArray<CardInstance> mCards;

            Util::TT800 mRng;
            UInt32Array mCardDistribution;
            SInt32Array mCardsToDeal;

            SInt32Array mCardStack;
            SInt32Array mCardTray;
            SInt32Array mPlayfield;

            Logic::BaseTimeframe mGameStartTimeout;
            Logic::BaseTimeframe mGameEndTimeout;
            UInt32 mDealCount;

            UInt32 mNumberOfGamesPlayed;
        };
Here, a part of the header is shown.
In order to simplify the implementation, the StateMachine class Logic::EnumStateMachine<States>::Type mStateMachine is used.
The card instances are created in the array ObjectArray<CardInstance> mCards.
(!) For objects the ObjectArray template class has to be used instead of the Array template class.
In order to easily measure timespans, a TimeFrame class is used: e.g. Logic::BaseTimeframe mGameStartTimeout.
Logic Initialization
Bool App::CardGameLogic::OnInit(const Logic::IState* state)
{
    state->GetLoader()->UnloadPackage("startup");

    const Graph::IRoot* root = state->GetGraphRoot();

    AddGraphNode(mScreenTimeline.GetReference(root, "/game_screen/screen_timeline"));
    AddGraphNode(mGameInfoText.GetReference(root, "/game_screen/info_text"));
    AddGraphNode(mStackButton.GetReference(root, "/game_screen/stack_button"));

    mCards.Empty();
    AddSuit(root, "clubs");
    AddSuit(root, "diamonds");
    AddSuit(root, "hearts");
    AddSuit(root, "spades");
    mCards.Add().Init(GetNodeObserver(), root, "/game_screen/black_joker", 0);
    mCards.Add().Init(GetNodeObserver(), root, "/game_screen/red_joker", 0);

    if (!AreGraphNodesValid())
    {
        return false;
    }

    mScreenTimeline->Start(Real(0.0), Real(0.5));

    for (UInt32 i = 0; i < mCards.GetCount(); i++)
    {
        AddStepable(mCards[i]);
    }

    AddStepable(mGameStartTimeout);
    AddStepable(mGameEndTimeout);

    mStateMachine.Register<CardGameLogic>(STATE_DEAL, this, &CardGameLogic::OnProcessTickDeal,
                                          &CardGameLogic::OnEnterDeal);
    mStateMachine.Register<CardGameLogic>(STATE_PLAY, this, &CardGameLogic::OnProcessTickPlay,
                                          &CardGameLogic::OnEnterPlay);
    AddStepable(mStateMachine);

    return true;
}
The first block initializes as usual several references to the corresponding nodes
The next block initializes the card instances and adds them to the mCards object array.
Afterwards, all references are checked and the mScreenTimeline is started to display the playing screen.
Furthermore, in the next block all card instances are added to the processor in order to also call the OnProcessTick() methods of the card instances in every logic step.
TimeFrame
The TimeFrame class is a stepable object and is added to the processor with AddStepable(mGameStartTimeout).
Timeframes can measure a certain timespan and signalize their course. The time measurement starts by calling the method Start(). The methods for querying the condition of the timeframe class are named as the methods of timeline classes, e.g. IsRunning(), WasRunning() etc.
StateMachine
The logic class StateMachine allows calling methods subject to a freely selectable condition.
Up to four methods can be assigned to one condition: An OnProcessTick(), an OnEnter(), an OnLeave() and an onFinishTick() method. Unused methods can be assigned to null-pointers.
The OnProcessTick() method of the current condition is called in every logic step. When the next condition is set, the OnLeave() method of the old condition and the OnEnter() method of the new condition are called.
In our tutorial, the methods OnProcessTickDeal() and OnEnterDeal() are assigned to the STATE_DEAL condition. The methods OnProcessTickPlay() and OnEnterPlay() are assigned to the STATE_PLAY condition. In our case, the STATE_IDLE is the initial condition and does not need a method.
The StateMachine class is a stepable object and is added with AddStepable(mStateMachine) to the processor.
- Note
- Tip: Stepable instances are processed in the added order. Therefore, it is recommended to add the
StateMachineas last class since at this stage all other objects are already calculated. -
Attention: Usually, in the processor stepables are processed before the
OnProcessTick()method of the processor.
Logic Processing
void App::CardGameLogic::OnProcessTick(const Logic::IState* state)
{
    if (mScreenTimeline->WasRunning())
    {
        mStateMachine.SetNextState(STATE_DEAL);
    }

    Logic::IDeviceHandler* deviceHandler = state->GetDeviceHandler();
    if (deviceHandler->WasRawButtonPressed(RAWBUTTON_BACK))
    {
        deviceHandler->TerminateApp();
    }
}
Since the StateMachine is used the actual OnProcessTick() method is rather short.
At first, the StateMachine is set onto the STATE_DEAL as soon as the playing screen has been fully displayed.
The second block is only necessary for Android devices to actually close the application when pressing the back button.
Game Data Setup
The card instances are located in the ObjectArray mCards and remain there forever. The gameplay only saves indices, which refer to the card instances.
The gameplay only decides where and how and the card instances are shown.
The method ShuffleCards() creates with the RNG a random sequence of card indices in mCardsToDeal. These are used as follows:
The first 28 indices are moved to mPlayfield which represents the pyramid.
All other indices are moved to mCardStack which is the pile of the remaining cards.
During gameplay the corresponding indices are moved from mPlayfield or mCardStack to mCardTray which represents the revealed pile.
Processing of the application states
Bool App::CardGameApp::Configure(IEngineConfiguration* engineConfig, IFileInterface* fileInterface)
{
    const IPlatformConfiguration* platformConfig = engineConfig->GetPlatformConfiguration();
    IAppConfiguration* appConfig = engineConfig->GetAppConfiguration();

    engineConfig->SetProductName("CardGame");
    appConfig->SetWindowTitle("CardGame");

    if (platformConfig->IsTargetClassMatching(IEnums::TARGET_CLASS_COMPUTER))
    {
        if (platformConfig->IsOperatingSystemMatching(IEnums::OPERATING_SYSTEM_WINDOWS))
        {
            engineConfig->SetVideoApi(IEnums::VIDEO_API_DX9);
        }

        appConfig->SetDisplaySurfaceSize(1024, 768);
        appConfig->SetLockWindowAspectEnabled(true);
        appConfig->SetFullScreenEnabled(false);
    }

    if (platformConfig->IsTargetClassMatching(IEnums::TARGET_CLASS_HANDHELD))
    {
        appConfig->SetOrientationActive(true);
        appConfig->SetAutoRotationActive(true);
        appConfig->SetScreenOrientation(IEnums::SCREEN_ORIENTATION_LANDSCAPE_1);
        appConfig->SetAllowedScreenOrientations(appConfig->GetLandscapeOrientations());
        appConfig->SetMultiTouchActive(true);
    }

    engineConfig->SetDeactivatedAppRunState(IEnums::APP_RUN_STATE_PAUSED);

    return true;
}
When a window is activated or deactivated, the setup engineConfig->SetDeactivatedAppRunState(IEnums::APP_RUN_STATE_PAUSED) executes the following method:
void App::CardGameLogic::OnRunStateChanged(const Logic::IState* state, IEnums::AppRunState currentState,
                                           IEnums::AppRunState previousState)
{
    if (mGameStartTimeout.IsOrWasRunning())
    {
        return;
    }

    if (currentState == IEnums::APP_RUN_STATE_PAUSED)
    {
        mGameInfoText->SetText("- Paused -");
        if (mStateMachine.GetCurrentState() == STATE_PLAY)
        {
            UpdatePlayfield(Real(0.0), true);
        }
    }
    else if (currentState == IEnums::APP_RUN_STATE_RUNNING)
    {
        mGameInfoText->SetText("- Play -");
        if (mStateMachine.GetCurrentState() == STATE_PLAY)
        {
            UpdatePlayfield(Real(0.3), false);
        }
    }
}
This method covers the cards, when the window is deactivated, and reveals the cards as soon as the window is activated again.
If the application is paused as defined by the engine, the logic time stops and no OnProcessTick() is executed. The rendering, however, continues normally and the OnProcessFrame() methods are still called.
On mobile devices this mechanism works identically upon application shutdown. However, closed applications are paused by the current operating systems and hence no rendering and no OnProcessFrame() takes place.
On iOS devices the following entry has to be made in the info.plist of the application:
<key>UIApplicationExitsOnSuspend</key>
    <false/>
This entry is also called "Application does not run in background" in the editor.
Exercise
The game should remain paused, when the user returns to the running game. Furthermore, the user should be asked to click onto or touch the playing field in order to continue the game.
Debug vs. Release
Within the debug configuration we usually work directly with the resources in the corresponding directories, e.g. game.murlres. This has the advantage to be able to test modifications within the files during application development without previously starting the resource_packer.
In the release configuration, however, all resources are generated and a corresponding package is created with the resource_packer, e.g. game.murlpkg. The necessary scripts are called with an additional build step in the development environment in order to ensure that the current resources are in the packages as well.
In Xcode such additional build steps can only be set once per target and without being subject of the debug/release setting. For this reason, we need to create these two targets in our example:
CardGameDevDebug-Build configurationCardGameRelease-Build configuration with corresponding script build step.
Everything Step
Our tutorial shows that almost every object needs a certain timespan to present itself. This can be achieved by implementing the OnProcessTick() method.
Hence, it has to be ensured that every instance of an OnProcessTick() method is called exactly once in each logic step.
In our tutorial, we add several stepable objects to the processor. The largest objects are the 54 card instances which are added 54 times. Every card instance implements a StepableObserver, which has added the animation instances within the card instance.
(!) A good program should consider the need of OnProcessTick() calls already during draft and implementation phase.
(!) A typical error is, if stepable instances are either called multiple times or not at all.
For those interested, here the course per logic step is sketched:
Here, it can be seen that a ProcessTick() method is called internally at first. Afterwards, a corresponding method, e.g. OnProcessTick() or OnEvaluate(), is called.
(!) Basic rule: Hands off the ProcessTick() methods, if you do not exactly know what you are doing. Preferably, applications should work with OnProcessTick() methods and other On...() methods. It is possible that software updates in the engine change the behavior of methods. The behavior of On...() methods, however, always remains the same.