A brief introduction to the Murl Engine development
The Murl Engine is a native, platform-independent, time-based scene graph framework for developing games and multimedia applications. The framework has been designed for maximum performance and flexibility and it allows the cross platform development of native applications with only a single code base.
Native and Cross Platform
The framework development package consists of a platform-independent core module (“framework code”) and a platform-specific adaption module (“platform code”) for each supported platform. The framework code was developed in C++ and the platform code in C, C++, ObjectiveC and Java depending on the actual target.
Application development (“user code”) is performed in C++ or LUA based on the framework's API (Application Programming Interface). It is possible to create a native application for each supported target platform from these three components: user code, framework code and platform code.
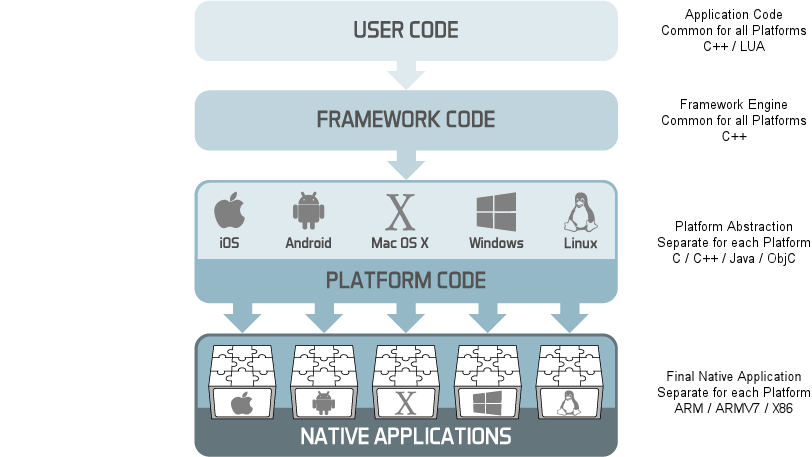
Using C++ for native application development allows efficient programming at a high abstraction level with optimum run-time performance.
In this context, the term “native” means that the created applications can be directly run on the selected target devices with their actual operating systems. There is no need for additional plugins, emulators, run-time environments or similar external components, which helps to reach optimum performance and system integration.
Basically, application development can be performed by using any available C++ IDE. However, the framework's support for project creation and maintenance is currently only provided for Microsoft Visual Studio (Express) and Apple XCode, which are therefore recommended for application development.
In order to build applications for iOS and/or Mac OS X, a computer running Mac OS X and XCode is necessary, whereas a computer running Microsoft Windows and Visual Studio is required for the development of Windows applications. Applications for Android can be built on both of these systems.

Time Based
Applications are executed in a time-based manner. The framework uses a rendering thread and a logic thread, which are always processed simultaneously in order to create a sequence of individual display frames.
During the process of each loop, the logic thread calls a user code method (e.g. OnProcessTick()), which can be used to update the current state of the application. Typically, the implementation of this method should check how much time has passed since the last call (e.g. GetCurrentTickDuration()) and which user input has been carried out. Based on this information, the application is “simulated” and relevant objects are updated accordingly.
After finishing this procedure one or more times, the rendering thread starts to actually render all visible objects, while the logic thread already begins to evaluate the subsequent step.
The logic thread's actual step size (i.e. the time between two steps) can be defined via specific items in the main configuration of the framework. It is possible to either select a fixed or variable step size. Furthermore, it is also possible to define a minimum and maximum time value. Additionally, the configuration allows defining the actual number of steps which are carried out for each frame, again with possible minimum and maximum values.
Scene Graph
In order to describe the virtual world, the Murl Engine uses a scene graph. A scene graph is an object-oriented data structure, specifically a directed acyclic graph (DAG). Within a scene graph individual objects can be stored, transformed and/or grouped together in a user-defined way.
The scene graph represents a tree-like structure made up from individual graph nodes with exactly one root node and any number of child nodes. Each graph node contains specific information about the virtual scene such as geometry, color, light sources, audio sources or transformation depending on its specialization.
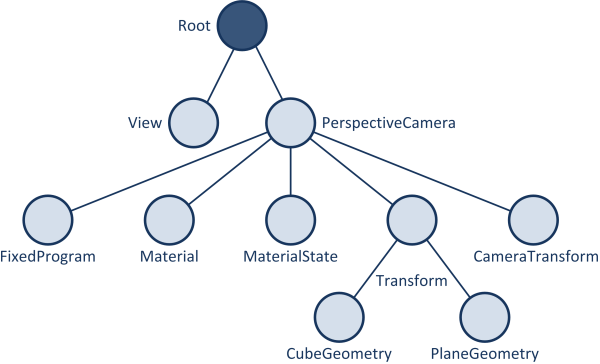
Usually, every graph node affects its child nodes. For instance, a Transform node can be used to hierarchically modify e.g. the position and rotation of the sub-graph below the node, i.e. all of its children, grand-children etc. Generic nodes may be e.g. made invisible, which also affects all child nodes in their sub-graphs.
State nodes, such as MaterialState, ParametersState or CameraState, form an exception. State nodes cause a change in the current traversal context and affect therefore not only the child nodes, but also all subsequent nodes. If, for instance, a MaterialState node is used to select a certain material, every subsequent node is rendered with this material until a different material is chosen with another MaterialState node.
The graph node SubState can be used to locally restrict state changes. That means that any context changes within a child of a SubState node do not affect any subsequent nodes. After processing its child nodes, the SubState node resets all changes made to the traversal context.
All types of graph nodes have some basic properties in common:
- unique
id activepropertyvisibleproperty
The id property is used to clearly identify a specific node in the graph. The visible property allows controlling the visibility of the node and its child graphs. All nodes, which are set invisible, are skipped during the rendering of a frame (the Output Traversal is skipped). The active property controls, if logic operations are carried out or not (the Logic Traversal is skipped). To completely deactivate a node, both the active and visible properties must be set to false. This can either be done separately or via the combined activeAndVisible property.
- Note
- Caution, only alphanumeric characters and the characters point and underscore are allowed as any character of the id property. In addition, id properties may not start with a numeric character. Other characters (e.g. -, +, :, etc.) are not allowed.
During the process of each loop, the framework performs a number of traversals on the specified scene graph. Starting at the root, the graph is processed in a depth-first manner. All children are visited recursively in the order they are defined. For the sample graph above, the order, in which the graph nodes are traversed, is as follows:
- Root
- View
- Camera
- FixedProgram
- Material
- MaterialState
- Transform
- CubeGeometry
- PlaneGeometry
- CameraTransform
Basically, there are two different traversals which are carried out during each loop - Logic Traversals and Output Traversals:
- A logic traversal always happens directly after the calls in the
OnProcessTick()methods of the user code are finished. Nodes, whose properties were modified through the user code, have their internal state updated, and a physics simulation step is performed, if the graph contains nodes which require such an action. - After all logic traversals for a frame are finished, a single output traversal is carried out. All relevant information for output generation is gathered and all visible nodes are prepared for rendering.
XML Files
One way to build a scene graph or parts of a scene graph for the Murl Engine is to create one or more text documents using XML notation. These XML files can be loaded into the system memory by the application. Afterwards, the individual nodes can be accessed and modified as required. The following paragraphs give a brief overview of the structure of such a file.
<?xml version="1.0" ?>

<Graph>
  <View id="view" />

  <Camera id="camera"
      viewId="view"
      fieldOfViewX="400"
      nearPlane="400" farPlane="2500"
      clearColorBuffer="1" >

    <!-- comment -->
    <FixedProgram id="prg_white" />

    <Material id="mat_white"
        programId="prg_white" />

    <MaterialState materialId="mat_white"
        slot="0" />

    <Transform id="transform">

        <CubeGeometry
          id="myCube01"
          scaleFactor="200"
          posX="0" posY="0" posZ="0" />

        <PlaneGeometry
          id="myPlane01"
          scaleFactorX="42"
          scaleFactorY="100"
          posX="0" posY="0" posZ="0" />
    </Transform>

    <CameraTransform cameraId="camera"
        posX="0" posY="0" posZ="800" />
  </Camera>
</Graph>
Generally, XML documents start with an optional XML declaration, e.g. <?xml version="1.0" ?>
Elements within an XML document are indicated by < >. Every element consists of a start tag <element> and an end tag </element>. Child elements are defined in between the start and end tags. For elements, which do not contain any child elements, the empty element tag <element/> can be used optionally. Defining an element via <element></element> is equivalent to <element/>.
Attributes of an element are specified in the start tag (or in the empty element tag) as a pair of attribute name and attribute value: attributeName="attributeValue"
Comments within an XML file start with <!-- and end with -->.
- Note
- Caution! Individual attributes cannot be put within comment markers.
There are several basic rules for an XML document to be well-formed:
- A well-formed XML document has to contain exactly one root element, which encloses all other (child-) elements.
- For every start tag there has to be exactly one matching end tag at the same nesting level and vice-versa.
- All attribute names of an element must be unique (there cannot be two or more attributes with the same name within an element).
Naming Conventions
CLASSES, NAMESPACES, FUNCTIONS, METHODS
Class, namespace, method and function names start with an upper-case letter
e.g. MyApp or LoadData()
INTERFACES
Interface names begin with an upper-case I
e.g. IAppConfiguration
VARIABLES
Variables start with a lower-case letter
e.g. rotationAngleX
MEMBER VARIABLES
Member variables start with a lower-case m
e.g. mVar
FILE NAMES
File names are composed of namespace and class name and consist only of lower-case letters, digits and/or underscore (“_”) as separator.
e.g. murl_my_app.cpp / murl_my_app.h for class MyApp inside the namespace Murl
Primitive Data Types
C++ compilers are free to define the standard C++ data types with e.g. different bit depths and value ranges. For this reason, it should be considered to always use the platform-independent data types defined in the framework (Note the upper-case, e.g. Char instead of char .). These data types are defined in the file murl_types.h:
Matching container classes from murl_types.h:
Mathematical constants from murl_math_types.h:
Corresponding mathematic functions are located in the namespace Murl::Math:
Further util functions can be found in the namespace Murl::Util e.g.:
Strings
Furthermore, the framework provides its own string class, together with a number of conversion functions and useful auxiliary functions.
Debug Messages
The header file murl_debug_trace.h contains methods to print debug messages.
DEBUG::TRACE, DEBUG::ERROR
The function Debug::Trace can be used to print simple status information to the console. On some platforms, the output also includes time stamp information. Just as for the function printf, formatting parameters can be used optionally.
Debug::Trace("Hello World!");
Debug::Trace("The result is %u:", result);
Any output of Debug::Trace calls will only be generated in the debug mode and will automatically be omitted during the release build of an application. If a message should be visible in a release build as well, Debug::Error can be used instead.
MURL_TRACE
The command MURL_TRACE prints in addition to the status information also the method name and the line number. Optional formatting parameters can also be used.
MURL_TRACE(0, "Debug Hello World");
The first parameter (0) defines the log level for this messages. Debug messages with a log level greater than the global log level will be suppressed. If for example the global log level is set to 1, only debug messages with a log level smaller than or equal to 1 are printetd. You can use the method SetLogLevel and GetLogLevel to set or read the global log level. The printed status information would look like this:
The output of MURL_TRACE calls will also only be generated in the debug mode.
SYSTEM::CONSOLE::PRINT
Another way to print information to the console is the Murl::System::Console::Print function. By using this function, the output will be retained even in a release build. In addition, it prints the given text “as is”, with no extra information such as time stamp, new lines etc.
It also accepts optional formatting parameters:
System::Console::Print("Print with System Console");
System::Console::Print("Current Time %.10f", state->GetCurrentTickTime());
PRINTTREE
By using the PrintTree method, it is possible to print the structure of the current scene graph to the console:
Graph::IRoot* root = state->GetGraphRoot();
root->PrintTree();
Depending on the given start node, it is possible to print the whole scene graph or only a sub-graph.
Graph::INode* node = mBallTransform->GetNodeInterface();
node->PrintTree();
SETUSERDEBUGMESSAGE
As soon as the “debug” package is loaded by the application, the method SetUserDebugMessage of the Murl::Logic::IState interface can be used to show a simple status message on the screen:
state->SetUserDebugMessage("Package Loading succeeded!");