Currently, the only directly supported additional target platform on Windows systems is Android. To deploy your applications also on Mac OS X or iOS, you need access to a computer running Mac OS X.
Installing the Android Toolchain
Summary
- Install the Android Toolchain (Java JDK, Android SDK, Android NDK and Apache Ant)
- Create/adapt Environment Variables
- Install desired Android SDK Platforms
- Install the ADB USB Driver for your mobile phone
Android Toolchain
In order to deploy your applications for Android, you need to download and install the following packages:
- The Android SDK (software development kit), available at
http://developer.android.com/sdk/index.html
(choose "Download For Other Platforms" -> "SDK Tools Only" -> "Windows 32 & 64-bit" -> "zip archive") - The Android NDK (native development kit), available at
http://developer.android.com/tools/sdk/ndk/index.html
(choose "Windows 32-bit" or "Windows 64-bit" depending on your operating system) - The Apache Ant software tool for automating software build processes, available at
http://ant.apache.org/bindownload.cgi
(choose "Current Release of Ant" -> "zip archive") - The Java SE Development Kit, available at
http://www.oracle.com/technetwork/java/javase/downloads/index.html
(choose JDK -> accept License -> "Windows x86" or "Windows x64" depending on your operating system)
Now, please start the executable Java JDK installer, select an install directory (e.g. C:\Program Files\Java\jdk1.7.0_25) and follow the installation instructions. When finished create a directory (e.g. C:\Android) and extract all downloaded zip archives into this directory. The folder structure should look like this:
At the time of writing this guide, the following versions of SDK and NDK were verified to work with the Murl Engine (other versions may work as well):
- Android SDK Tools:
23.0.5 - Android SDK Platform-tools:
21 - Android NDK:
r10c - Apache Ant:
1.9.1 - Java JDK:
1.7
Environment Variables
When you are done installing the Android toolchain, you need to provide the information about the install path to the Murl Engine.
If you use the Dashboard, it is sufficient to enter the install path information of the SDK, the NDK and Ant in the Dashboard settings dialog.
If you want to use the build scripts also from a terminal, you need to provide two environment variables and adapt your PATH variable:
MURL_ANDROID_SDK_ROOT
should point to the location where the SDK is installed, e.g.C:\Android\sdkMURL_ANDROID_NDK_ROOT
should point to the NDK location, e.g.C:\Android\ndk
The following directories need to be in your PATH variable:
- Java JDK bin directory: e.g.
C:\Program Files\Java\jdk1.7.0_25\bin - Apache Ant bin directory: e.g.
C:\Android\ant\bin
You can create/change the environment variables through the system properties:
Control Panel -> System -> Advanced System Settings -> Advanced Tab -> Environment Variables
If you do not want to permanently change your environment variables, you can create a batch file in your install directory and call it prior to Android related commands. The batch file (e.g. C:\Android\init.cmd) should look like this:
Please note that the environment variables set with the batch file are local to the shell process (command prompt) in which they were set. If two shell processes are spawned and the value of an environment variable is changed, that change will not be seen by the other.
Android SDK Platforms
To build your apps for a specific Android version, you should download and install the respective SDK platform via the Android SDK Manager. Building the Murl tutorials as they are provided requires at least the API level 10 (Android 2.3.3) SDK. However, you may change the desired version by editing the make file (e.g. project/common/gnumake/module_hello_world_v1.mk) and change the values given for MURL_ANDROID_TARGET_API_LEVEL and MURL_ANDROID_MINIMUM_API_LEVEL accordingly.
In addition the following tools packages are needed: Android SDK Tools, Android SDK Platform-tools, Android SDK Build-tools
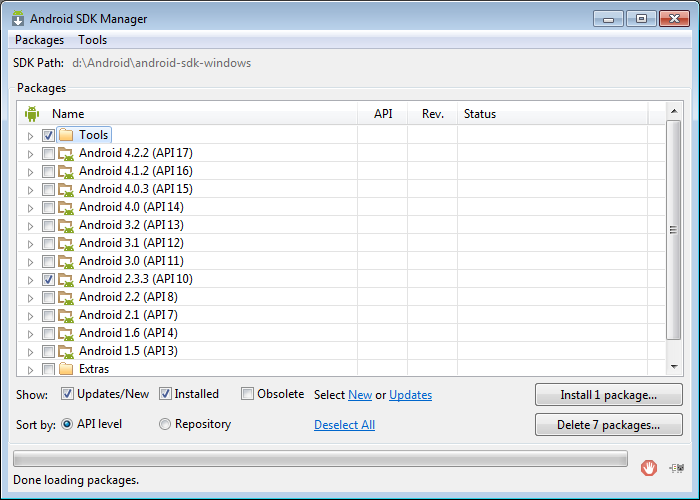
- Run the SDK Manager (by using the Dashboard or by starting "SDK Manager.exe" or "android.bat" from the Android SDK).
- Select desired packages to install e.g. Android SDK Tools, Android SDK Platform-tools, Android SDK Build-tools, Android 2.3.3 (API 10).
- Click the install button and wait until all packages have been downloaded and installed.
ADB USB Driver
This step is only necessary, if you want to install/debug Android apps directly to/on your mobile phone via a USB cable.
The Google USB driver can be downloaded and installed directly with the SDK Manager, but it is only suitable for Google Nexus Devices (except the Galaxy Nexus).
For all other mobile phones you need to download and install the appropriate ADB USB driver from the OEM. A list of OEM URLs can be found here:
http://developer.android.com/tools/extras/oem-usb.html#Drivers
After you have installed the driver, you should be able to connect to your mobile phone with the adb (Android Debug Bridge). In order to do so, you need to enable USB debugging on the phone itself (e.g. Settings -> Developer Options -> USB Debugging or Settings -> Applications -> Development -> USB Debugging) and plug the phone into your computer using the USB cable that came with the phone.
If you do not see "Developer Options" menu entry, go into "About device" in "Settings" and tap on the "Build number" entry seven times, which will unlock the "Developer Options" menu entry.
Start the command adb devices on your computer to show a list of all connected devices. Your output should look similar to this:
Testing the Android Build
When you are done, you can test the Android build using one of the provided tutorials, e.g. Hello World V1:
- Open a command prompt window and navigate to the tutorial's Android project folder, e.g.
C:\MyMurlInstallation\tutorials\chapter01\00_hello_world\project\android\gnumake - Start the Android build, e.g. in Debug mode by entering
build_debug.cmd - Deploy the resulting APK on your target device by entering
install_debug.cmd
Please note that a device must be connected to your computer for deployment.
Alternatively also the Dashboard offers a convinient way to build and deploy an Android project.