In this tutorial we will use the knowledge gained from the previous tutorials and enhance the first three versions of the Pong game:
- Solve window resize problems
- Sound support
- Multitouch support
At the end of the tutorial we show how the app can be deployed to the different target platforms.
Version 4: Window Resizing
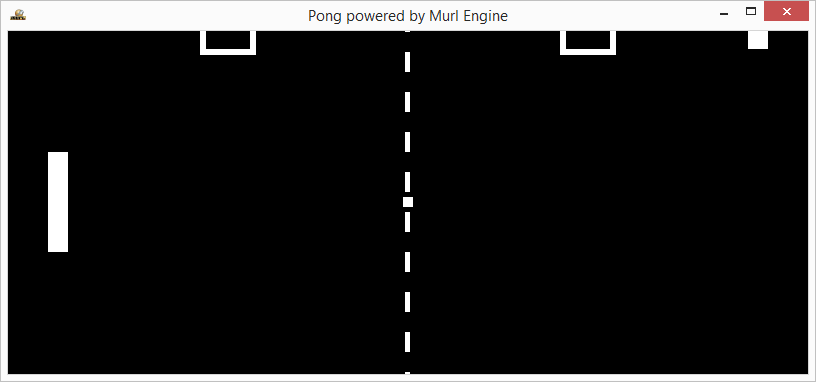
The first version of Pong was designed for a window size of 800x600 pixels. As soon as this aspect ratio changes, some problems occur:
- Parts of the playing field are cut off
- The conversion of the mouse coordinates in world coordinates is no longer correct.
In order to avoid cutting off parts of the playing field, the picture should be fitted with a margin; see also Fit Picture with Margin (Letterbox / Pillarbox).
Setting the two attributes fieldOfViewY="300" and aspectRatio="1" for the camera node would do the job but for training purposes we do the adjustment by our own in the logic code. We simply switch between the camera attributes fieldOfViewX and fieldOfViewY according to the current aspect ratio.
void App::PongLogic::AdjustCamera(const Logic::IState* state)
{
    const IAppConfiguration* appConfig = state->GetEngineConfiguration()->GetAppConfiguration();
    if (appConfig->HasDisplaySurfaceSizeChanged(mDisplaySurfaceSizeInspector))
    {
        UInt32 width = appConfig->GetDisplaySurfaceSizeX();
        UInt32 height = appConfig->GetDisplaySurfaceSizeY();
        if (Real(800.0 / 600.0) > (Real(width) / Real(height)))
        {
            mCamera->SetFieldOfViewX(400);
            mCamera->SetFieldOfViewY(0);
        }
        else
        {
            mCamera->SetFieldOfViewX(0);
            mCamera->SetFieldOfViewY(300);
        }
    }
}
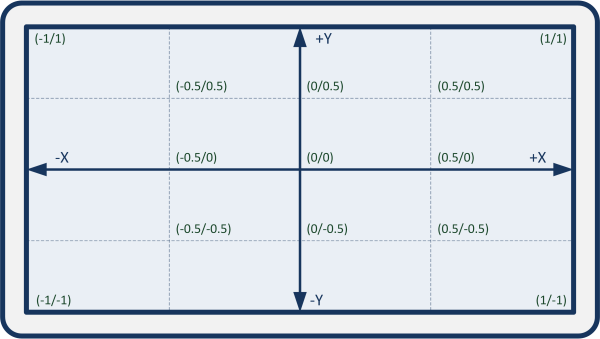
The camera is used for the correct conversion of the mouse coordinates as well. The X/Y values of the mouse pointer are always within the range from -1 to +1. To convert these values, we have multiplied the value of the Y-coordinate by 300 so far. If the window is higher, the displayed area within in the virtual world increases. The correction value of 300 is thus no longer valid and therefore needs to be readjusted.
For a simple conversion between screen and world coordinates the camera object provides the methods GetWorldPositionFromScreen() and GetLocalPositionFromScreen(). These methods need the X/Y-values and the camera distance as parameters.
- Note
- The distance towards the camera has to be specified as negative number, as the camera viewing axis runs along the negative Z-axis in the default coordinate system as discussed in the Cube tutorial.
The call for our example is:
mCamera->GetWorldPositionFromScreen(posX, posY, -800);
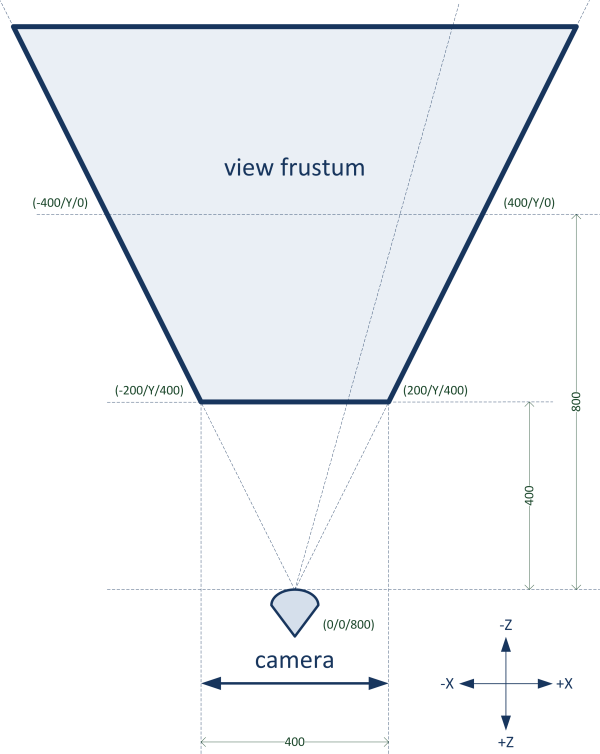
The method GetWorldPositionFromScreen() always delivers absolute world coordinates, regardless of the position or perspective of the camera. By using the method GetLocalPositionFromScreen(), it is possible to query the world coordinates relative to the camera.
GetWorldPositionFromScreen() multiplies the values of GetLocalPositionFromScreen() with the transformation matrix for the camera. If the camera position is (0/0/0) and the perspective along the Z-axis is towards -∞, GetWorldPositionFromScreen() and GetLocalPositionFromScreen() deliver the same values.
In our case, it is possible to use both methods. The position of the camera is (0/0/800) and it looks towards negative infinity. Therefore, both methods deliver the same values for the X/Y-position. The following code delivers the requested position values.
        Real posX, posY;
        deviceHandler->GetMousePosition(posX, posY);
        Vector vectorLocal = mCamera->GetLocalPositionFromScreen(posX, posY, -800);
        Vector vectorWorld = mCamera->GetWorldPositionFromScreen(posX, posY, -800);
        Debug::Trace("world %f %f %f", vectorWorld.x, vectorWorld.y, vectorWorld.z);
        Debug::Trace("local %f %f %f", vectorLocal.x, vectorLocal.y, vectorLocal.z);
The result confirms the assumption: The X/Y-values are identical, the Z-values, however, are moved by 800 units.
Due to inaccuracies, which always occur when calculating with floating point numbers, the values for Z are not exactly 0 and -800. Therefore, it is recommended to manually correct the result after calculation.
Vector vectorWorld = mCamera->GetWorldPositionFromScreen(posX, posY, -800);
vectorWorld.z = Real(0);
As we only need the Y-value, we use the method GetLocalPositionFromScreen() without correcting the Z-value.
    // Right Paddle Mouse
    if (deviceHandler->WasMouseMoved())
    {
        Real posX, posY;
        deviceHandler->GetMousePosition(posX, posY);
        Vector vectorLocal = mCamera->GetLocalPositionFromScreen(posX, posY, -800);
        //Vector vectorWorld = mCamera->GetWorldPositionFromScreen(posX, posY, -800);
        //Debug::Trace("world %f %f %f", vectorWorld.x, vectorWorld.y, vectorWorld.z);
        //Debug::Trace("local %f %f %f", vectorLocal.x, vectorLocal.y, vectorLocal.z);

        mPaddleRightPosY = vectorLocal.y;
        if (mPaddleRightPosY > Real(300))
            mPaddleRightPosY = Real(300);
        if (mPaddleRightPosY < Real(-300))
            mPaddleRightPosY = Real(-300);

        mPaddleRightTransform->SetPositionY(mPaddleRightPosY);
    }
Version 5: Sound
Again, we download suitable sound files from https://www.freesound.org .
https://www.freesound.org/people/NoiseCollector/sounds/4391/https://www.freesound.org/people/NoiseCollector/sounds/4361/
The wav files have a 32 bit float format and therefore need to be converted into an integer format (e.g. 16 bit PCM) before use. For this purpose, the free audio editor Audacity (audacity.sourceforge.net) can be used.
The new files are added to the file package.xml, while the remaining sound nodes are packed into the files graph_sound_instance.xml and graph_sounds.xml (as in the Audio tutorial).
<?xml version="1.0" ?>

<Package id="package_main">

    <!-- Sound resources -->
    <Resource id="sfx_boing_paddle" fileName="sounds/sfx_boing_paddle.wav"/>
    <Resource id="sfx_boing_wall" fileName="sounds/sfx_boing_wall.wav"/>

    <!-- Graph resources -->
    <Resource id="graph_main" fileName="graph_main.xml"/>
    <Resource id="graph_line" fileName="graph_line.xml"/>
    <Resource id="graph_segment" fileName="graph_segment.xml"/>
    <Resource id="graph_mat" fileName="graph_materials.xml"/>
    <Resource id="graph_sound_instance" fileName="graph_sound_instance.xml"/>
    <Resource id="graph_sounds" fileName="graph_sounds.xml"/>

    <!-- Graph instances -->
    <Instance graphResourceId="graph_main"/>

</Package>
In the file graph_main.xml we create a Listener instance and the sound instances. Afterwards, we activate the Listener with a ListenerState node:
    <Listener
        id="listener"
        viewId="view"
    />
    <ListenerState
        listenerId="listener"
    />

    <Instance graphResourceId="package_main:graph_sounds"/>
In order to play the sound, we create two TimelineNode objects and two suitable methods.
            Logic::TimelineNode mSFXBoingWall;
            Logic::TimelineNode mSFXBoingPaddle;
            void SFXPlayWall();
            void SFXPlayPaddle();
    AddGraphNode(mSFXBoingPaddle.GetReference(root, "sounds/sfx_boing_paddle/timeline"));
    AddGraphNode(mSFXBoingWall.GetReference(root, "sounds/sfx_boing_wall/timeline"));
void App::PongLogic::SFXPlayWall()
{
    mSFXBoingWall->Rewind();
    mSFXBoingWall->Start();
}

void App::PongLogic::SFXPlayPaddle()
{
    mSFXBoingPaddle->Rewind();
    mSFXBoingPaddle->Start();
}
void App::PongLogic::UpdateBallPosition(Logic::IDeviceHandler* deviceHandler, Double tickDuration)
{
    if (mGameIsPaused)
        return;

    mBallPosX += mBallDirectionX*mBallSpeed*tickDuration;
    mBallPosY += mBallDirectionY*mBallSpeed*tickDuration;

    // Intentional ignore ball width for collisionPosition
    // collisionPositionX = paddlePosition - paddleWidth/2 = 350 - 20/2 = 340
    if (mBallPosX >= 340)
    {
        Real distance = mPaddleRightPosY - mBallPosY;
        if (Math::Abs(distance) <= 55)
        {
            SetAndNormalizeBallDirection(Real(-1),Real(-2)*distance/55);
            mBallSpeed += Real(50);
            SFXPlayPaddle();
        }
        else
        {
            MissedBall();
        }
    }

    // Intentional ignore ball width for collisionPosition
    if (mBallPosX <= -340)
    {
        Real distance = mPaddleLeftPosY - mBallPosY;
        if (Math::Abs(distance) <= 55)
        {
            SetAndNormalizeBallDirection(Real(1), Real(-2)*distance/55);
            mBallSpeed += Real(50);
            SFXPlayPaddle();
        }
        else
        {
            MissedBall();
        }
    }

    if (mBallPosY > 295)
    {
        mBallPosY = 590 - mBallPosY;
        mBallDirectionY *= -1;
        SFXPlayWall();
    }
    else if (mBallPosY < -295)
    {
        mBallPosY = -590 - mBallPosY;
        mBallDirectionY *= -1;
        SFXPlayWall();
    }

    mBallTransform->SetPositionX(mBallPosX);
    mBallTransform->SetPositionY(mBallPosY);
}
Version 6: Multi-Touch Input
Finally, we add multi-touch support to the application. The object IAppConfiguration provides various methods in order to control the activation and deactivation of the multi-touch device.
config->SetMultiTouchActive(Bool enable)config->IsMultiTouchActive()config->HasMultiTouchActiveChanged(ChangeInspector& inspector)
The Logic::IDeviceHandler's method GetNumberOfTouchDevices() determines how many virtual touch devices exist and how many fingers can be simultaneously recognized by the device. By using the method GetTouchPosition() the touch position can be queried with X and Y-values always ranging between -1 and +1. The Graph::ICamera's methods GetLocalPositionFromScreen() and GetWorldPositionFromScreen() then convert these values into camera-space and world-space coordinates, respectively.
In order to start the game, at least three fingers have to touch the screen:
    // Multi-Touch Game Start
    UInt32 numTouchPressed = 0;
    if (mGameIsPaused)
    {
        UInt32 numTouch = deviceHandler->GetNumberOfTouchDevices();
        for (UInt32 i = 0; i < numTouch; i++)
        {
            if (deviceHandler->IsTouchPressed(i))
                numTouchPressed++;
        }
    }

    // Game Pause
    if ((deviceHandler->WasRawKeyPressed(RAWKEY_SPACE)) ||
        (deviceHandler->WasMouseButtonPressed(IEnums::MOUSE_BUTTON_LEFT)) ||
        (numTouchPressed > 2))
    {
        mGameIsPaused = !mGameIsPaused;

        if (mGameIsPaused == false)
            if ((scoreLeft == 9) || (scoreRight == 9))
                ResetScore();
    }
To control the left paddle, the touch device with the smallest X-position on the left half of the screen should be used. Analogously, the right paddle is controlled by the touch device with the largest X-position on the right side:
    // Multi-Touch Left and Right Paddle
    UInt32 numTouch = deviceHandler->GetNumberOfTouchDevices();
    if (numTouch > 1)
    {
        Real posX = 0, posY = 0, actualPosXLeft = 0, actualPosXRight = 0;
        for (UInt32 i = 0; i < numTouch; i++)
        {
            if (deviceHandler->IsTouchPressed(i))
            {
                deviceHandler->GetTouchPosition(posX, posY, i);

                if ((posX < 0) && (posX < actualPosXLeft))
                {
                    actualPosXLeft = posX;
                    Vector vectorLocal = mCamera->GetLocalPositionFromScreen(posX, posY, -800);
                    mPaddleLeftPosY = vectorLocal.y;
                }
                if ((posX > 0) && (posX > actualPosXRight))
                {
                    actualPosXRight = posX;
                    Vector vectorLocal = mCamera->GetLocalPositionFromScreen(posX, posY, -800);
                    mPaddleRightPosY = vectorLocal.y;
                }
            }
        }
    }
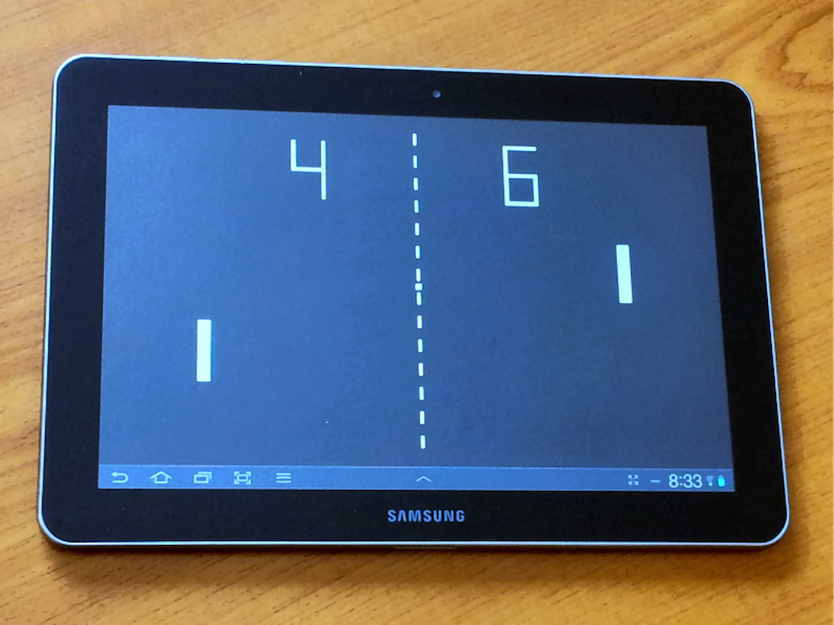
With these modifications, it is possible to play the game also on multi-touch devices.
Screen Orientation
In order to ensure that the game is properly displayed in landscape mode on smartphones and tablets, it is necessary to set the value for allowed screen orientations (in the IAppConfiguration to SCREEN_ORIENTATIONS_LANDSCAPE) and to activate auto rotation and the orientation device:
    if (platformConfig->IsTargetClassMatching(IEnums::TARGET_CLASS_COMPUTER))
    {
        appConfig->SetDisplaySurfaceSize(800, 600);
        appConfig->SetFullScreenEnabled(false);
    }
    else if (platformConfig->IsTargetClassMatching(IEnums::TARGET_CLASS_HANDHELD))
    {
        appConfig->SetAutoRotationActive(true);
        appConfig->SetOrientationActive(true);
        appConfig->SetAllowedScreenOrientations(IEnums::SCREEN_ORIENTATIONS_LANDSCAPE);
    }
Additionally, for Android devices it is necessary to set the screen orientation also in the makefile project/common/gnumake/module_pong_v6.mk, as Android does not support changing the app orientation at run-time (see also Android Deployment)::
MURL_ANDROID_SCREEN_ORIENTATION := landscape
See the section Android Deployment below on how to build the app for Android devices.
Target Deployment
This section shows how the Pong game (and previous tutorials) can be deployed to all target platforms supported by the Murl Engine.
Windows Deployment
Configuration
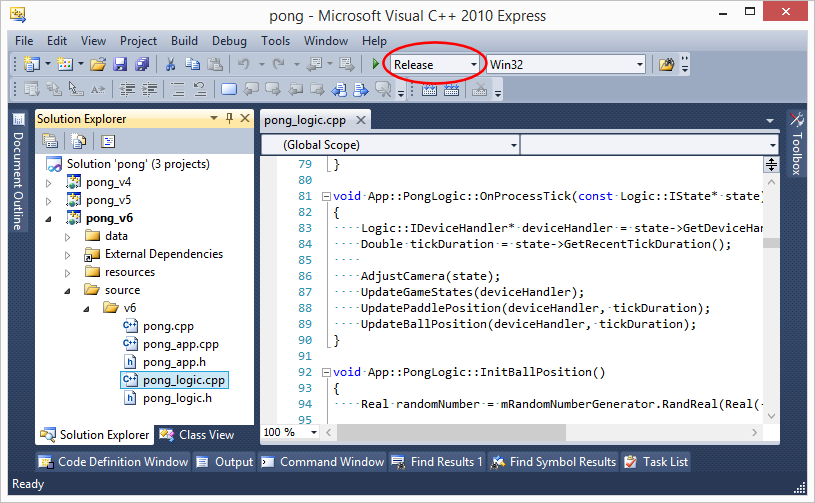
So far, we have created all projects with the debug profile. In order to develop a release version for Windows, the compiler profile (configuration) needs to be modified. Available profiles are Debug and Release.
Resource File
We now have to modify the resource file according to our needs. The resource file has the suffix .rc and is located in the resources subfolder:
resources/v6/win32/pong.rc
In order to edit the file in Visual Studio, we right-click the file in the Solution Explorer and choose "View Code". The first section of the code shows general information about the application. This information is adopted in the final application and can be displayed via e.g. right-click->Properties->Details.
#define APP_TITLE       "pong_v3"
#define APP_VERSION     "1.0.0.0"
#define APP_VERSION_INT  1,0,0,0
#define APP_COMMENTS    "Authors: Spraylight GmbH"
#define APP_COMPANY     "Spraylight GmbH"
#define APP_COPYRIGHT   "2012 Spraylight"
With IDI_APP_ICON ICON "murl.ico" the icon of the application is selected. In our case, we choose the file murl.ico. The icon is packed as graphic resource into the final application and shown as program icon. It is possible to create your own icon with e.g. the standard Windows program Paint.
IDI_APP_ICON ICON "../../../resources/common/win32/murl.ico"
On Windows all Murl resource packages are looked up by default in the sub-folder resources. The directory structure has to look as follows:
Alternatively, it is possible to directly add the Murl resource packages to the final application via rcdata. By doing so, all resources are packed into a single file and no other files (except for an .exe file) are necessary in the installation directory.
We pack the startup and main package into the final application.
//
// Game resources
//

#ifndef _DEBUG

startup.murlpkg   RCDATA "../../../data/v6/packages/startup.murlpkg"
main.murlpkg      RCDATA "../../../data/v6/packages/main.murlpkg"

#endif // _DEBUG
Further information on the format of .rc files can be found in the MSDN documentation of Microsoft.
Build Solution
The final application can be created in the menu via Build->Build Solution (F7). The application is located as .exe file in the sub-folder binaries/win32/ followed by the compiler version (vs2008/vs2010) and the name of our profile (in our case: Release).
binaries/win32/vs2010/Release/pong_v6.exe
Besides the .exe file, also a .pdb file (pong_v6.pdb) can be found in this sub-folder. This file is a program database containing debug and project status information and is not needed to run the application. It can be either ignored or deleted.
binaries/win32/vs2010/Release/pong_v6.pdb
The .exe file can be run without installation and without any other program packages. If desired, an installer package can be made with any installation software (e.g. Inno Setup: www.jrsoftware.org/isinfo.php).
Android Deployment
Configuration
In order to be able to create an Android version of our game, we have to configure the makefile first. A common makefile is provided in the directory project/common for all platforms which use the Make build utility (e.g. Android, Linux, Rasperry):
project/common/module_pong_v6.mk
The file can simply be edited with a text editor and is divided into logical subsections. Comments start with a # character.
Default settings, output path and output file:
Source files:
Resource directories which should be packed by the Resource Packer prior to the application generation:
Resource packages (and other files) which should be packaged into the application bundle:
Android specific statements:
Most of the stated Android values are directly copied into the Android manifest file. The Android developer documentation contains further information about possible values - see developer.android.com/.../manifest-intro.html.
The parameter MURL_ANDROID_PERMISSIONS defines the app permissions. We don't need additional permissions and therefore explicitly specify an empty value with "MURL_ANDROID_PERMISSIONS := ". Omitting this statement would be possible as well and would have the same effect. The next lines are commented out and only serve as an example of how to define multiple permissions.
The parameter MURL_ANDROID_SCREEN_ORIENTATION defines the allowed screen orientation (see also developer.android.com/...android:screenOrientation).
Splash Screen (optional)
Optionally the parameter MURL_ANDROID_SPLASH_IMAGE can be used to specify a image which will then be displayed as splash screen during startup (without this parameter no splash screen is shown). The parameter MURL_ANDROID_SPLASH_SCALE_TYPE defines the scale type. One of the following values can be used:
centercenterCropcenterInsidefitCenter(default)fitEndfitStartfitXY
See also developer.android.com/.../ImageView.ScaleType.html for further information.
Caution! Make sure to execute the Android->Clean All command when changing a setting for the splash screen to ensure that all files will be rebuilt.
Resources
Android specific resource files like the icon file (drawable/icon.png) or the image for the optional splash screen (drawable-land-nodpi/loader_background.png) are located in the directory:
resources/v6/android
The parameters MURL_ANDROID_RESOURCE_PATH and MURL_ANDROID_RESOURCE_FILES can be used to specify the resource files. All specified files will be copied directly into the res directory of the .apk archive. Further information about Android resources and the possibility to specify alternative resources for different screen densities can be found on the Android developer website on page developer.android.com/...AlternativeResources.
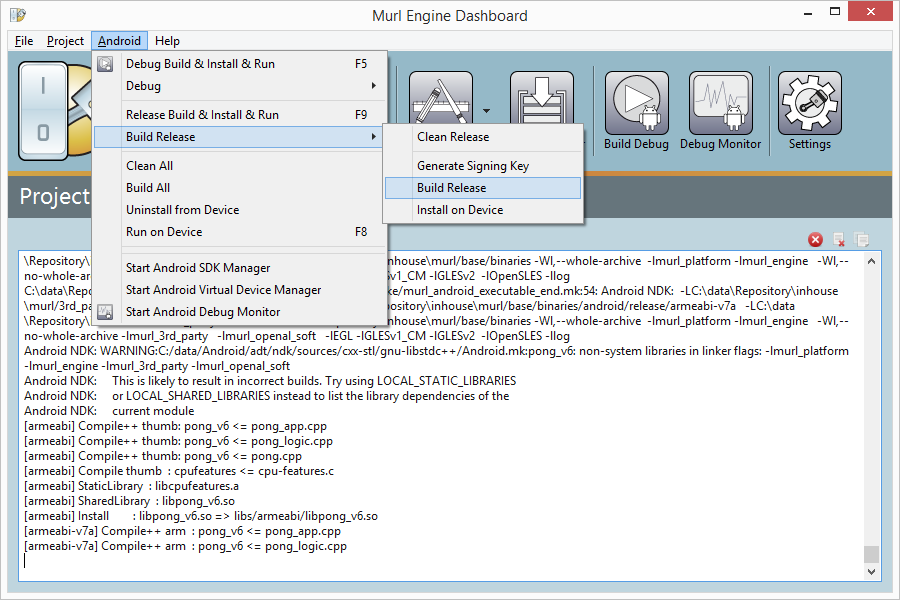
Build
The easiest way to do an Android build is by using the tool Dashboard. The "Android" menu contains several commands to build Android apps in debug or in release mode and to install them onto Android devices.
Alternatively the shell scripts in the directory project/android/gnumake can be used.
All files which are created during the build process are stored in the directory project/android/gnumake/build followed by the configuration name (debug or release). For example the generated debug Android manifest file can be found in the folder
project/android/gnumake/build/debug/apk/pong_v6/AndroidManifest.xml
Release Build, Signature
The release build process requires a signature key which can be created with the Java tool keytool; see also developer.android.com/.../app-signing.html. The easiest way to get a key is using the Dashboard command
- Android->Build Release->Generate Signing Key
The created key is stored as a .keystore file in the directory project/android/gnumake and is used for release builds automatically. Keep the .keystore file in a safe, secure place. You must use the same key to sign future versions of your application.
project/android/gnumake/murl_release.keystore
If a signature key has been created, the Dashboard can be used to perform a release build. The final app can be found as .apk file in the directory binaries/android/release/v6.
binaries/android/release/v6/pong_v6.apk
The .apk file can be uploaded and published in e.g. the Google Play Store.
Besides the .apk file, also some sub-directories (armeabi and armeabi-v7a) containing some shared object files and archive library files can be found in this sub-folder. These directories and files are not needed to run the application and can be either ignored or deleted.
iOS Deployment
Configuration
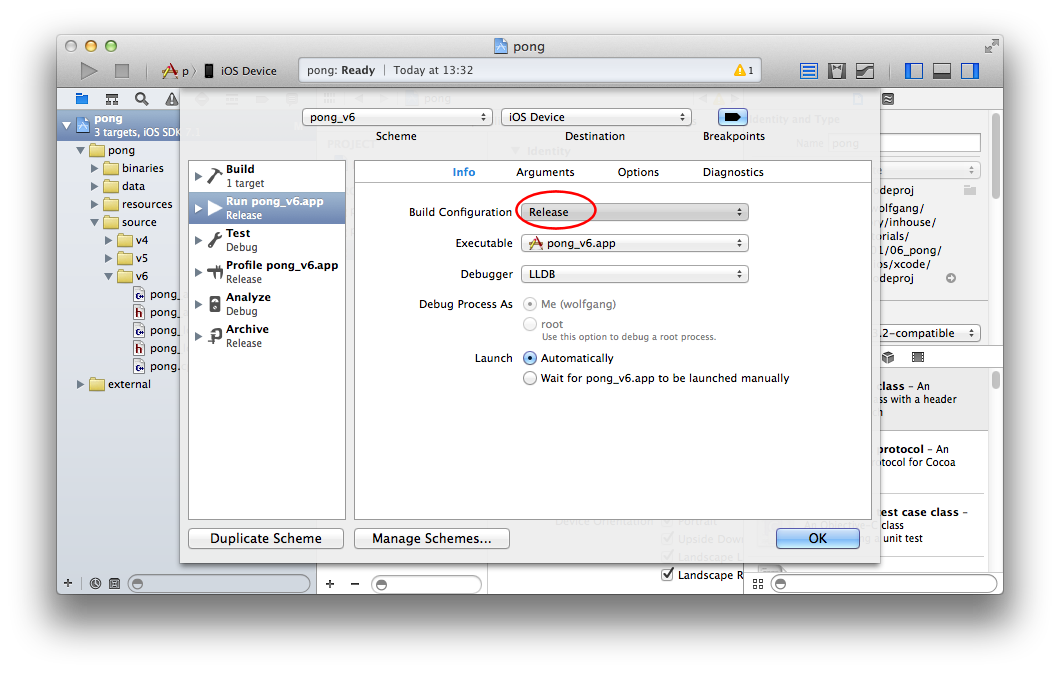
In order to create a release build, the "Build Configuration" needs to be changed from Debug to Release.
- Click current scheme: Edit Scheme -> Info -> Build Configuration -> Release
Resources
General App information like version number, identifier, device orientation, icons etc. can be set in the "General" tab of the project settings. All changes will be stored in the Info.plist file. In our case this is the file
resources/common/ios/murl-Info.plist
All further iOS resources like the icon images, the launch image, the artwork file etc. are also located in the same directory. See developer.apple.com/.../App-RelatedResources.html for further information.
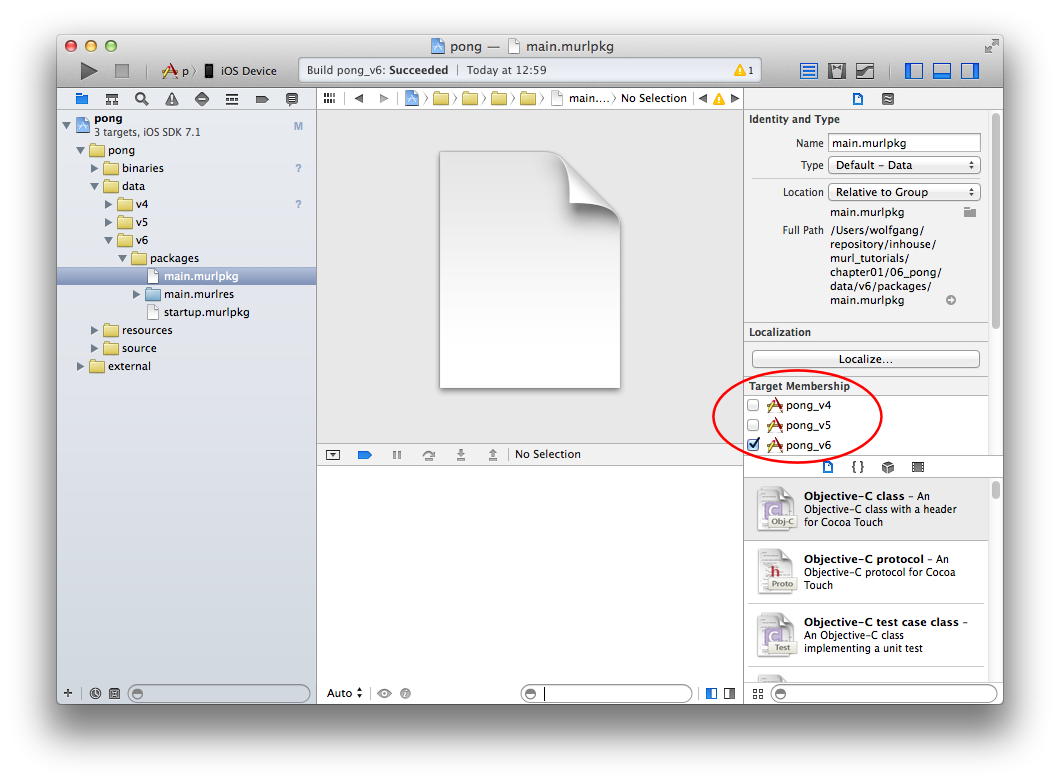
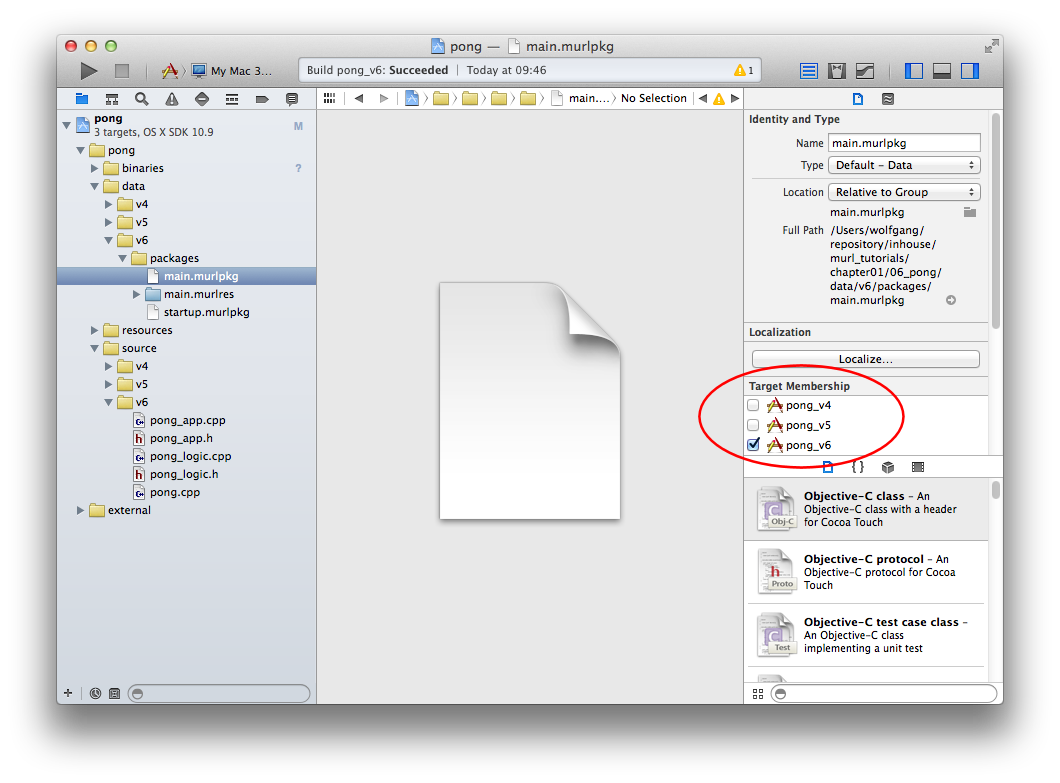
During development usually Murl resource directories are used. When doing a release build, however, binary packages are the better alternative. Hence we add the "Target Membership" for the file main.murlpkg and remove it for the folder main.murlres.
- Note
- All bundle resources can also be changed in Project Settings -> Build Phases -> Copy Bundle Resources.
Build App
The menu command Product -> Build can be used to create a release build. The application file can be found as .app bundle in the folder binaries/ios/Release-iphoneos.
binaries/ios/Release-iphoneos/pong_v6.app
The resource packages are included in the bundle and can be verified using the Finder menu command Show Package Contents.
If a iOS developer device (provisioned for development) is connected to your computer, you can build the App and install it to your device by pressing the run button ("Build and then run the current scheme").
You can use Xcode to upload your Murl App directly into the Apple App Store. More detailed information can be found in the App Distribution Guide from Apple.
Mac OS X Deployment
The build process for building OS X applications is very similar to the build process for building iOS apps.
Configuration
In order to create a release build for OS X, the "Build Configuration" needs to be changed from Debug to Release.
- Click current scheme: Edit Scheme -> Info -> Build Configuration -> Release
Resources
General App information like version number, identifier, icons etc. can be set in the "General" tab of the project settings. All changes will be stored in the Info.plist file. In our case this is the file
resources/common/osx/murl-Info.plist
Also the App Icon file is located in the same directory (resources/common/osx/Icon.icns) and can be changed if needed.
Additionally the file Credits.rtf is available in the directory resources/v6/osx. The file contains the information the user sees when choosing About.
During development usually resource directories are used. When doing a release build, however, binary packages are the better alternative. Hence we add the "Target Membership" for the file main.murlpkg and remove it for the folder main.murlres.
- Note
- All bundle resources can also be changed in Project Settings -> Build Phases -> Copy Bundle Resources.
Build App
The final application can be created in the menu via Product -> Build. The application file can be found as .app bundle in the folder binaries/osx/Release.
binaries/osx/Release/pong_v6.app
The resource packages are included in the bundle and can be found in the subfolder Contents/Resources. The Finder menu command Show Package Contents can be used to verify if the right resource packages have been added.
Besides the .app file, also a .app.dSYM file can be found in the release folder. This file contains debug symbols and is not needed to run the application. It can be either ignored or deleted.
Information about the submission to the Mac App Store can be found in the Mac developer documentation on page Submitting to the Mac App Store.